Deploy a Node.js App to Oracle Cloud

As developers, we may need to deploy applications very often, for MVPs, personal projects, or maybe some project at work. In this article, I will guide you step by step on how to deploy your application and share it on the internet.
Prerequisites:
- To have an instance running on Oracle cloud with Ubuntu.
- To have its ssh private key to connect to the instance.
- To have a Linux terminal to work with (I’ll be using zsh).
Generate public key and configure ssh
I’ll assume you have the private key given by Oracle cloud when you create your instance (in my case it will be acecom-server-3), and you have it store it somewhere on your PC. Now we have to move it to the right place, .ssh folder (it should be located in your home directory), you can do that by running:
cp acecom-server-3 ~/.ssh/Now you have to give it the right permissions (read permissions for the super user), you can achieve that by running the following command:
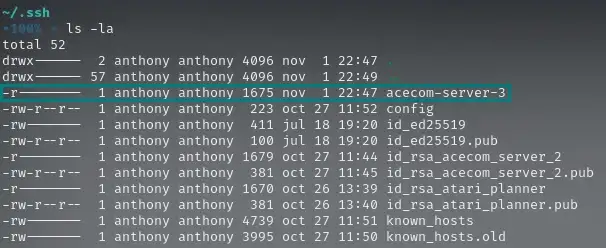
chmod 400 acecom-server-3Now, go to your .ssh folder, by running cd ~/.ssh and there run ls -la, it should look like follows:
Then, you have to create its public pair, to do that you can run the following command:
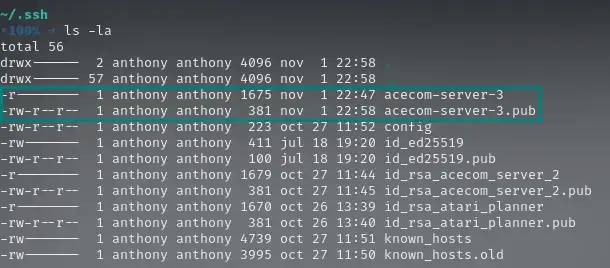
ssh-keygen -y -f acecom-server-3 > ./acecom-server-3.pubFor more information about ssh-keygen command, you can take a look at this. Now, after you run ls -la again, you may look something like this:
Configuring the ”config” file
So far, so good. Now, I will show you a trick, in order to connect with our instance faster, with only typing (at least for my case) ssh acecom-3.
First, let’s create a config file by typing nano config, and in this file, we will add some configurations for our ssh command:
- The host (the name of the instance we want to access to by ssh).
- The hostname (public IP of your instance).
- The user (the user we want to use to access the instance).
- The identity file (the corresponding ssh private key to use for the ssh connection).
In the end, it will look something like:
Host acecom-3
    Hostname 0.0.0.0 (your public instance IP)
    User ubuntu
    IdentityFile ~/.ssh/acecom-server-3
At this point, you have to save your file and then exit nano.
In the case of Oracle Cloud, the default user name its ubuntu, unless you changed it manually (by creating new users, groups, etc.), you have to access your instance using this user.
Finally, we can type ssh acecom-3 in our terminal. The first time we do this, we will get a message that says:
The authenticity of host '0.0.0.0 (0.0.0.0)' can't be established.
ED25519 key fingerprint is SHA256:/QIh1Zg/1234...
This key is not known by any other names
Are you sure you want to continue connecting (yes/no/[fingerprint])?
You just have to type “yes” and press the enter key, and just like magic we are connected with our instance, it may look as follows:

First connection
Once connected, you have to update and upgrade the package list to do clean installations. So first run: sudo apt update, once its finished you have to run sudo apt upgrade and you will be ready to go.
Installing zsh, oh-my-zsh and spaceship (optional)
I’m a huge fan of zsh, I always install it on every Linux machine I have, even in virtual machines and instances. I find it pretty useful — it has extensions, auto-complete, themes, and so on. So if you want to give it a try, continue reading this section, if you don’t, skip this, but consider that on the next sections, all the screens shots of the terminal from the instance will have zsh instead of bash.
First of all, we have to install zsh (I will be following this guide), so you have to run sudo apt install zsh. Then, after installing, if you run zsh --version you will see an output as follows:
zsh 5.8 (aarch64-unknown-linux-gnu)Then, we have to make it our default shell, for that we will run chsh -s $(which zsh). Here, some people may have been asked for a password, but what password? Since we haven’t configured any password yet, it may look pretty strange, but don’t worry, you can fix it. To fix it, you have to edit your /etc/pam.d/chsh file, which may look like (to see its content just run cat /etc/pam.d/chsh):
#
# The PAM configuration file for the Shadow `chsh' service
#

# This will not allow a user to change their shell unless
# their current one is listed in /etc/shells. This keeps
# accounts with special shells from changing them.
auth       required   pam_shells.so

# This allows root to change user shell without being
# prompted for a password
auth            sufficient      pam_rootok.so

# The standard Unix authentication modules, used with
# NIS (man nsswitch) as well as normal /etc/passwd and
# /etc/shadow entries.
@include common-auth
@include common-account
@include common-session
So here you have to change “required” by “sufficient” and it will do the trick. You can do this by editing this file using sudo nano /etc/pam.d/chsh.
Then you can run chsh -s $(which zsh), but nothing will happen, don’t worry, you have to close the connection and open it again. Once you do that, you will see a configuration menu asking you to add some configs for you zsh, I recommend you to choose the default config, but feel free to customize it as you like. Once you finish configuring your zsh, you will notice that your shell has changed, and if you run echo $SHELL, you will see an output like /bin/zsh or similar.
Now we have zsh already installed, we can continue and install oh-my-zsh by running:
sh -c "$(curl -fsSL https://raw.github.com/ohmyzsh/ohmyzsh/master/tools/install.sh)"And if everything went correct, you will see that your shell has changed again, and it looks very good, but we can improve it even more by installing Spaceship. So according to its docs, you have to run the following command to clone the repo and save it in the zsh themes:
git clone https://github.com/spaceship-prompt/spaceship-prompt.git "$ZSH_CUSTOM/themes/spaceship-prompt" --depth=1Then you have to create a symlink the theme to the oh-my-zsh custom themes folder by running:
ln -s "$ZSH_CUSTOM/themes/spaceship-prompt/spaceship.zsh-theme" "$ZSH_CUSTOM/themes/spaceship.zsh-theme"Now, you have to edit your .zshrc file and set ZSH_THEME="spaceship", you can do that by running nano ~/.zshrc, once you have modified the theme I suggest you go to the end of the file and uncomment the example aliases and add some new ones (those that may be useful for you), in my case I always add one:
# Example aliases
alias zshconfig = "nano ~/.zshrc"
alias ohmyzsh = "nano ~/.oh-my-zsh"
alias ra = "source ~/.zshrc" # to update the .zshrc file
And we got it! We have a beautiful shell with auto-complete. Also, there are many plugins we can add, like nvm, node, wakatime, git, Python, and so on. If you have uncommented the aliases I suggest you, now whenever you want to add a new plugin, alias, or custom command, you simply run zshrc and it will open your .zshrc, there you can customize everything you want. Once you are done, you simply run ra and all the changes will be updated.

Installing Node.js
Now, we will take the most important step: installing Node.js. To do this, we will use nvm. So first, you need to install it, to do that we will run:
curl -o- https://raw.githubusercontent.com/nvm-sh/nvm/v0.39.0/install.sh | bashOnce it’s installed, you will see an output as follows:
...

=> Appending nvm source string to /home/ubuntu/.zshrc
=> Appending bash_completion source string to /home/ubuntu/.zshrc
=> Close and reopen your terminal to start using nvm or run the following to use it now:

export NVM_DIR="$HOME/.nvm"
[ -s "$NVM_DIR/nvm.sh" ] && \. "$NVM_DIR/nvm.sh"  # This loads nvm
[ -s "$NVM_DIR/bash_completion" ] && \. "$NVM_DIR/bash_completion"  # This loads nvm bash_completion
To verify that it was installed correctly, please close and reopen your ssh connection and type nvm -v, if you get an output with the version, everything is ok. If you have any trouble, please check the docs.
Now, we will install node, you can install whatever version you need using nvm i 10, in case you want to install node version 10, but in my case I will install the LTS version, if that is your case too, please run: nvm i --lts. If everything went correctly you should have the following output:
...
Checksums matched!
Now using node v16.13.0 (npm v8.1.0)
Creating default alias: default -> lts/* (-> v16.13.0)
We almost got it, now to verify that the installation went correct, please close and reopen your ssh connection and type node, if a node.js terminal got opened, everything went correct (you can close it by typing ctrl + D).
You probably want to install yarn (if you don’t please skip this part), so to do that just run npm i -g yarn and that’s it, yarn is available in your instance.
Finally, let’s install pm2 to deploy our services. You have to run npm i -g pm2 and that’s it.
Congratulations, you have covered the 50% of the process! Now we will get our hands dirty doing some additional configurations in our Oracle instance and deploying our first application as an example!
Deploying your app in the instance
Now that almost every configuration is done, and we have node.js installed in our instance, we have to deploy our application, to do that please create a folder where your projects will live, something like “dev”, “development” or “projects”, or just pick the home folder, in my case, I will create a folder with my name, were my apps will be, using mkdir anthony, then I move to that folder with cd anthony and here is where the magic will begin.
The following was taken from this tutorial and this one. First, run the following command in your folder (replace k-csv with your project name):
git init --bare k-csv.gitThis will create a bare repository that you can link to your local repo, you can think of this repository as a remote configuration repository where you can push your changes and execute some actions in the project (by using hooks).
Then you have your create your project folder, here will be the real project files that you will be pushing from your local machine, to do that please run mkdir k-csv, at the end, your folder should look like this:

So far, so good, now we will create a custom hook, post-receive hook to be precise, this hook will be triggered after every push you do to your remote repo, to do that please go to your hooks folder using: cd ./k-csv/hooks.
Once there please run nano post-receive, this will create the post-receive file and open the nano editor with it, there you have to add the following:
#!/usr/bin/bash

PATH="/home/ubuntu/.nvm/versions/node/v16.13.0/bin:/home/ubuntu/bin:/usr/local/bin:/usr/local/sbin:/usr/local/bin:/usr/sbin:/usr/bin:/sbin:/bin:/usr/games:/usr/local/games:/snap/bin"
WORK_TREE="/home/ubuntu/anthony/k-csv"
GIT_DIR="/home/ubuntu/anthony/k-csv.git"

while read oldrev newrev refname
do
  git --work-tree=$WORK_TREE --git-dir=$GIT_DIR checkout -f $refname

  cd $WORK_TREE

  pm2 stop k-csv

  yarn install --prod

  yarn add webpack webpack-node-externals -D

  yarn build

  pm2 start

  cd $GIT_DIR

  git --work-tree=$WORK_TREE --git-dir=$GIT_DIR branch | grep -v "undeleted" | xargs git --work-tree=$WORK_TREE --git-dir=$GIT_DIR branch -D
done
Then save your file and you are ready to push your changes, but what are we doing here? Well, let me explain you line by line:
- We are specifying which bash are we using, it is located in
/usr/bin/bash. - We are re-declaring the path, but why? Well, while working with Oracle instances I’ve learned that in every push the shell doesn’t get the path correctly, it has a very limited path (here is a StackOverflow question related to that) so the only solution I could find was to re-declare the path in my post-receive hook. If you are wondering where I got this path, you can find it by typing
echo $PATHin your terminal. - We are specifying the working directory and the git directory for our project.
- We are declaring a loop, but why? Well, whenever a post-receive hook is being triggered it receives 3 params
oldrev newrev refname, we only care of the last one, which is pointing to the current branch that is being pushed. We will delete it after doing the rest of the things we have to do because we want to be able to push whatever branch we want, whenever we want. - Now, that our loop is declared let’s focus on what is inside, first of all, we check out the content in the current branch, then we move to our work directory and there using
pm2we will stop the current process that is running (in the first push there won’t be any, it will throw an error, but is nothing to worry about) and then we will install our production dependencies. In my case, I will install alsowebpackandwebpack-node-externalsas development dependencies (because I usewebpackto build my project). Then we build our project and run our project again. - Finally, we move into the git directory and delete the current branch we are working on, as I mentioned above, this allows us to push whatever change we want whenever we want.
At this point, we have to add execute permissions to the script and we are ready to go, to do that please run: chmod +x post-receive.
Now we will your in hour local PC, so move into your project folder and there add the remote as follows:
git remote add deploy acecom-3:anthony/k-csvYou can name the remote whatever you want, and after the ”:” just type the directory where your remote project is located in your instance. To verify everything went correct, please run:
git remote -vAnd it has to show you something like:
deploy  acecom-3:anthony/k-csv (fetch)
deploy  acecom-3:anthony/k-csv (push)
origin  git@github.com:AnthonyLzq/k-csv.git (fetch)
origin  git@github.com:AnthonyLzq/k-csv.git (push)
So far, so good. Now you have to push your repository to the instance and the post-receive hook will do the magic. Please run (in my case I’m deploying my test branch, but you can deploy whatever branch you want):
git push deploy testThen you will receive a massive output coming in your prompt, that is the post-receive hook executing the script we declared.

Finally, at this point, if we go back to our instance and run pm2 status, we should see that our process is running correctly at the port we had specified, but if you try to access your app through Postman, Insomnia, or the browser, it won’t be able to reach it, and that is what we are going to see next.
Configuring the Oracle instance
The last step: here, we will cover how to open the ports and expose our application on the internet. This section is an adaptation of this tutorial.
Go to the dashboard of your instance in Oracle Cloud.
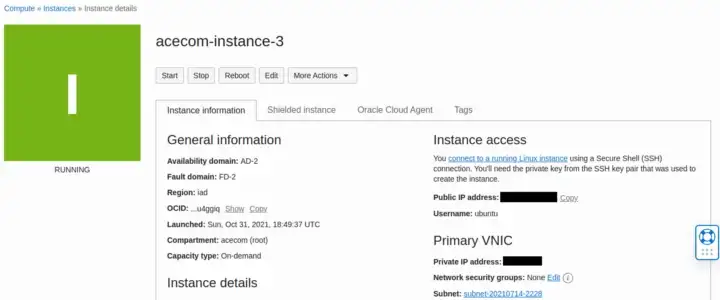
Once there, go to the Primary VNIC section and click on the subnet. It will redirect you to the subnet dashboard. You’ll find there contained the security rules that we will edit to allow people to connect to our application.
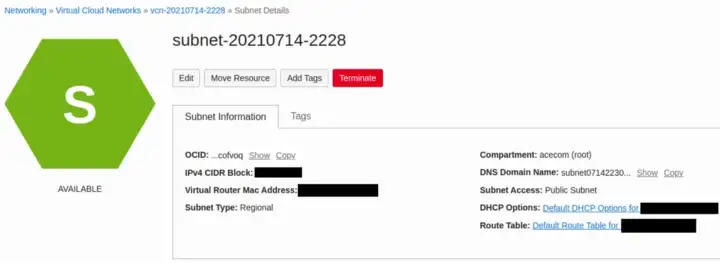
Scroll down to the Security Lists and click on the first option.
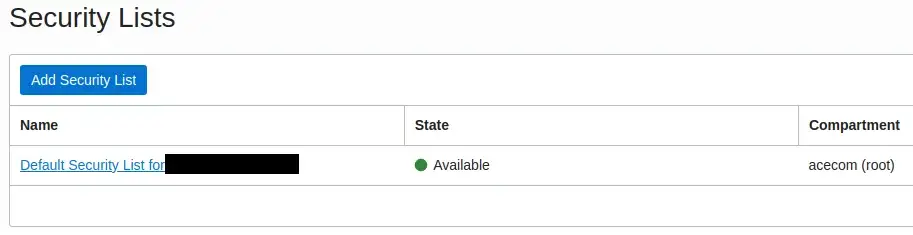
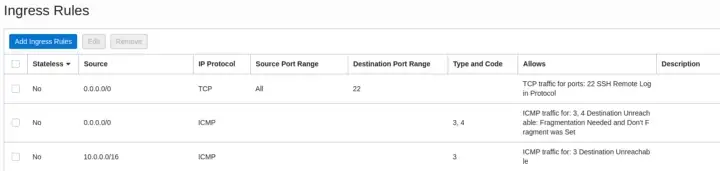
Once there, you will see a list of basic rules. There, you can add every rule you want, in this case, I will add 3 rules. Click in the “Add Ingress Rules”.
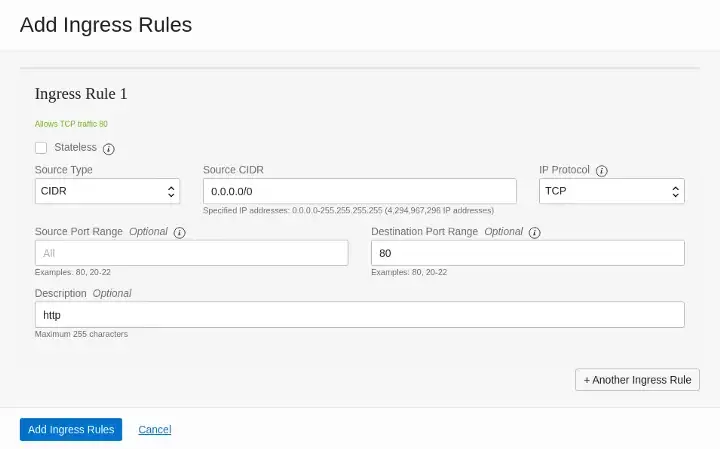
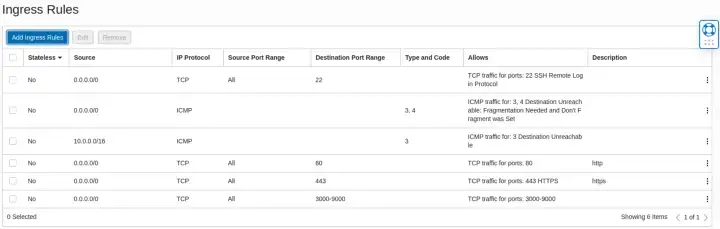
Once you click on it, add 0.0.0.0/0 in the Source CIDR, so your app will be available from anywhere on the internet. Then in the destination port set it to 80, to allow HTTP connections. Finally, click on the “Add Ingress Rules” and repeat the process for the port 443, to allow HTTPS connections.
Then, to open custom ports to the same process again, but in the destination ports, specify a port or a range of them that you want to open to the internet, in my case I will put 3000-9000. Finally, click on the “Add Ingress Rules” and your rules will be ready.
With this configuration, your ports are almost exposed to the internet, but there is one last step. To complete the configuration, please return to your terminal and connect to your instance via ssh. Once there, we need to remove the netfilter-persistent package, and activate the firewall using ufw. To do that, please run:
sudo apt remove netfilter-persistentOnce uninstalled, we have to allow the connections from ssh with ufw, to do that, please run:
sudo ufw allow 22/tcpNow we have to add the ports we open in the last step, we can achieve that by running:
sudo ufw allow 80/tcp
sudo ufw allow 443/tcp
sudo ufw allow 3000:9000/tcp
We are almost done, now if you run:
sudo ufw status numberedYou will get an output as follows:
status: inactiveSo we have to enable it, to do that please run:
sudo ufw enableOnce you do that, if you check the status again, you will receive the following output:
Status: active
     To                         Action      From
     --                         ------      ----
[ 1] 22/tcp                     ALLOW IN    Anywhere
[ 2] 80/tcp                     ALLOW IN    Anywhere
[ 3] 443/tcp                    ALLOW IN    Anywhere
[ 4] 3000:9000/tcp              ALLOW IN    Anywhere
[ 5] 22/tcp (v6)                ALLOW IN    Anywhere (v6)
[ 6] 80/tcp (v6)                ALLOW IN    Anywhere (v6)
[ 7] 443/tcp (v6)               ALLOW IN    Anywhere (v6)
[ 8] 3000:9000/tcp (v6)         ALLOW IN    Anywhere (v6)
But if you try to access your application through public-ip:port in your browser, you may not be able to see anything, so the last step will be to reboot your instance, you can do that in the dashboard of your instance, or manually typing sudo reboot. Once you have rebooted your instance, push again your changes to your deploy remote and now, your application should be running and exposed through the internet.

Hope it helped you!